Building an MCP server
Table of Contents
With Model Context Protocol being the buzz of the AI world, you may wonder how you can get started with it. We talked previously about how it works here.
Now let’s try building a basic MCP server to understand the process.
Prerequisites #
ℹ️ NOTE: I’ll use macOS for this setup, so your experience may vary.
Install Homebrew using these instructions
Python #
We’re going to use Python. Any version above 3.10 should work. Install it like so:
brew install python
Also install the Python package manager uv using the official instructions.
npx #
We’ll need npx as well. We can get it by installing the Node package manager npm.
Install the npm version manager nvm using these instructions.
Then install Node.js and npm. We’ll go with Node version 22 “Jod” (LTS).
nvm install lts/jod
That should give you Node.js, npm, and npx all at once. You can verify the npx installation by running:
npx --version
Set up your environment #
Create a workspace directory anywhere you’d like. For example:
mkdir /path/to/server-project-workspace/
Then navigate into the directory:
cd /path/to/server-project-workspace/
Create a Python virtual environment:
uv init
Install dependencies #
MCP SDK #
For developing your server you’ll need to install the MCP SDK.
Use uv to install the SDK:
uv add "mcp[cli]"
TextBlob #
We’re going to use TextBlob for analyzing text.
Use uv to install TextBlob:
uv add textblob
Create a basic server #
In your server project workspace, create a file called server.py:
cd /path/to/server-project-workspace
touch server.py
We’re going to write a basic server that will provide a tool to analyze text sentiment and surface a resource to return content based on sentiment.
Let’s add our imports.
from mcp.server.fastmcp import FastMCP
from textblob import TextBlob
Make sure to declare the MCP server instance.
mcp = FastMCP("Sentiment")
Now let’s add the tool.
@mcp.tool()
def analyze_text_sentiment(text: str) -> dict:
    """Analyze the sentiment of a provided text"""
    blob = TextBlob(text)
    sentiment_score = blob.sentiment.polarity

    if sentiment_score > 0.3:
        category = "happy"
    elif sentiment_score < -0.3:
        category = "sad"
    else:
        category = "neutral"

    return {
        "sentiment_score": sentiment_score,
        "sentiment_category": category,
    }
Now let’s add the resource.
@mcp.resource("mood://{mood}")
def get_mood_support(mood: str) -> dict:
    """Get supportive content based on the user's mood"""

    responses = {
        "happy": "Wonderful! Keep that positive energy going!",
        "sad": "Have you tried listening to some music or finding a squirrel?",
        "neutral": "Why don't you try something new today?",
    }

    return responses.get(mood.lower(), responses["neutral"])
You’ll also need to return the stdio output by adding the following:
if __name__ == "__main__":
    mcp.run(transport="stdio")
Run and test the server #
Great, we’ve got the code. Let’s give it a try!
Thanks to our installation of the MCP SDK earlier, we can use the MCP Inspector utility.
In the server-project-workspace directory, run:
uv run mcp dev server.py
It will output a message like:
MCP Inspector is up and running at http://127.0.0.1:{somePort}
Go ahead and open that URL in your browser to view the MCP Inspector.
For the Transport Type, select STDIO.
Click Connect and if that works, you will the inspector view populate.
Verify the Tool #
Let’s check that our tool is working. Click on Tools in the top menu, then click on List Tools.
You should see a list with analyze_text_sentiment in it. Click on analyze_text_sentiment.
Now in the form that appears on the right, add some text like “This is a bright and excellent day!”. Then click Run Tool.
If everything worked, you’ll see a response like:
{
  "sentiment_score": 0.85,
  "sentiment_category": "positive"
}
Verify the Resource #
Next, let’s check that our resource is working. Click on Resources in the top menu, then click on List Templates. The get_mood_support template should appear in the list. Click on it.
Now in the form that appears on the right, enter “positive”, “negative”, or “neutral”. Then click Read Resource.
If everything worked, you’ll see a response like:
{
  "contents": [
    {
      "uri": "mood://positive",
      "mimeType": "text/plain",
      "text": "Wonderful! Keep that positive energy going!"
    }
  ]
}
Integrating with an MCP client #
Now that we have a basic MCP server running, let’s see how we can integrate it with an MCP client.
It’s easiest to use an LLM-powered code editor like Cursor or Windsurf as an MCP client.
Depending on which one you choose, you’ll need to configure the MCP server definition. For Windsurf, this is where the config lives, and for Cursor it lives here.
The contents of the config will look something like below:
{
    "mcpServers": {
        "sentiment-server": {
            "command": "/path/to/server-project-workspace/.venv/bin/python",
            "args": [
                "/path/to/server-project-workspace/server.py"
            ],
            "description": "An MCP server to analyze text sentiment"
        }
    }
}
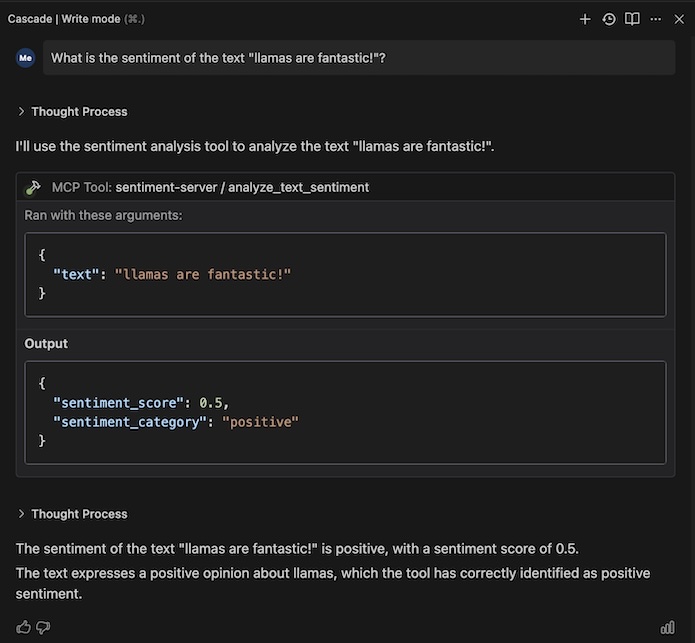
Below is what it looks like in action in Windsurf!
Conclusion #
You can find the code for this example here.
Hope that helps get you started! This is a simple example, and you can extend it or develop more complex MCP servers as you wish. Happy building!